I have an editable tabular form using Apex’s old greyscale edit link icons:
The users complained that they currently have to click each link to drill down to the detail records to find and fix any errors; they wanted the screen to indicate which detail records were already fine and which ones needed attention.
Since screen real-estate is limited here, I wanted to indicate the problems by showing a red edit link instead of the default greyscale one; since this application is using an old theme I didn’t feel like converting it to use Font Awesome (not yet, at least) and neither did I want to create a whole new image and upload it. Instead, I tried a CSS trick to convert the greyscale image to a red shade.
What this does is if there is an error for a particular record, the class "btnerr" is added to the img tag. Rows with no error will simply have class="" which does nothing.
Now, to make the greyscale image show up as red, I need to add an SVG filter to the HTML Header in the page:
I made up the values for the R G B lines with some trial and error. The filter is applied to the buttons with the btnerr class with this CSS in the Inline CSS property of the page:
img.btnerr {filter:url(#redshader);}
The result is quite effective:
But, as I noted earlier, this solution does not work in IE, so that’s a big fail.
NOTE: if this application was using the Universal Theme I would simply apply a simple font color style to the icon since it would be using a font instead of an image icon.
Every Interactive Report has an optional set of “Link” attributes that allow you to specify the location where the user should be redirected if they click a link next to a record in the report. You can choose “Link to Custom Target” and use the Link Builder to easily specify the target application, page, item values to pass, and other attributes.
What if the report combines different entities, and you need to direct the user to a different page depending on the type of entity? Or, if you need to direct the user to a different page with different attributes depending on the status of the record?
One method is to generate the URL in the report query using apex_page.get_url (Apex 5+) or apex_util.prepare_url (Apex 4 or earlier), or (God forbid) you could generate the url yourself using string concatenation.
A more declarative solution is to instead use Apex page redirects. This solution involves the following:
Add some hidden items to the page to store the parameters for each target page;
Add a Branch to the page for each target page; and
Add a Request to the link to signal the page that a redirect has been requested.
Here’s an example. My page 550 has an interactive report which combines TI records with TRQ records (both of which have a very similar structure). If the user clicks on a TI record they should be redirected to p510 with the corresponding TI_ID, and if they click on a TRQ record they should be redirected to p305 with the corresponding TRQ_ID.
Here’s the link attributes for this report:
Notice that the page now redirects back to itself with the request set to “GOTO_TARGET”, along with the IDs required. My report query has been constructed so that every record will only have a TI_ID or a TRQ_ID, never both at the same time; so the link will ensure that only one of the P550_GOTO_xxx_ID values will be set.
The page then just needs two Branches: one for each target. Conditions on each branch ensures they only get activated if the request has been set, and the branch is selected based on which “GOTO ID” item has been set:
For a normal navigation to this report (e.g. from another page), the request should be blank (or some other value) so none of the Branches should be triggered.
For a relatively simple scenario like this, I like the declarative approach. Each branch can take advantage of the full range of Apex features such as the link builder, security conditions, build options, etc.
Note: this method works just as well for Classic report links as well.
The thing to be mindful of is that the order of the branches, and the condition on each branch, must be carefully selected so that the correct branch is activated in each situation. I’ve shown a simple example which works because I have ensured that only one of the ID parameters is set at the same time. If a record has both IDs, the condition on the first branch “GOTO_TARGET (TI_ID)” will evaluate to True and it will be used, regardless of what GOTO_TRQ_ID was set to.
If there were numerous potential destination pages, with a large number of parameters to pass, I might choose the apex_page.get_url method instead.
I needed a simple password strength prompt for users when they need to create or change their password on my website. After a bit of Googling I found the “Low-Budget Password Strength Estimator” which is supposedly used by Dropbox, so you know it’s good :)
This simple javascript library runs entirely within the client’s browser, and when presented with a candidate password, gives a score from 0 (very poor) to 4 (very good). It can also return extra feedback, including a warning message for poor passwords, as well as suggestions for making a password more secure.
So I’ve created a very simple Dynamic Action plugin (try the demo here) that allows you to add this functionality to any item on your page. You can specify a minimum length for the password, and can override the default messages for each score. You can also select whether or not the feedback warnings or suggestions are shown.
It seems to catch a lot of poor passwords, including ones comprising common words and names, and ones involving a simple sequence or repetition.
Obviously it’s only really useful for password entry fields; but don’t use it on your Login page!
A common Apex project is to take a customer’s existing spreadsheet-based solution and convert it more-or-less as is into Apex. I’ve got one going at the moment, a budgeting solution where users need to enter their budget requests. They currently enter their requests into an XLS template file which generates subtotals and totals for them.
To do this in Apex I’m going to use a tabular form, and to do the subtotals I’ll use jQuery in a way not too dissimilar to that I described earlier.
Here is a mockup of the screen so far:
There are column totals that need to be added up and updated dynamically (indicated by the green arrows) as well as subtotals within each row (indicated by the red arrows).
I started by looking at the generated items, getting their ids (e.g. “f09_0001” etc) and writing the jQuery code to detect changes, add them up, and put the totals in the relevant items. I then started repeating this code for each column, and thought “hmmm”.
There were two problems with this approach that I could foresee:
The generated ids in a tabular form can change if the structure of the query changes – e.g. what was f08 + f09 => f10 might change to f09 + f10 => f11
I was aware of another form that I would need to build, with a similar structure except that there will be two sets of “Jan-Jun” + “Jul-Dec” columns, each with their own subtotal.
I wanted a more declarative solution, so that the heavy lifting will be done in one set of generic javascript functions, and I simply need to put attributes in the relevant columns to activate them. This is how I’ve approached this:
Create the tabular form as usual (mine is based on an Apex Collection) and remove the standard DML processes, replaced with my own that calls APEX_COLLECTION instead.
Create a standard report that generates the total items by calling APEX_ITEM.text, with p_attributes=>'data-total="x"' (with a different “x” for each column, e.g. year1).
Set the Static ID on the tabular form region (e.g. tabularform).
Set Element Attributes on the Jan-Jun column to data-cell="year1" data-col="year1_jan_jun", similarly for the Jul_Dec column.
Set Element Attributes on all the Year columns in the tabular form to data-col="yearx", where x is 1..5.
Set Element Attributes on the total for the first year to data-subtotal="year1".
The following is the query for the totals report region:
select APEX_ITEM.text(1, TO_CHAR(SUM(year1_jan_jun),'FM999G999G999G999G990D00'), p_size=>10, p_maxlength=>2000,
       p_attributes=>'disabled=true class="edit_money" data-total="year1_jan_jun"') as year1_jan_jun
      ,APEX_ITEM.text(2, TO_CHAR(SUM(year1_jul_dec),'FM999G999G999G999G990D00'), p_size=>10, p_maxlength=>2000,
       p_attributes=>'disabled=true class="edit_money" data-total="year1_jul_dec"') as year1_jul_dec
      ,APEX_ITEM.text(3, TO_CHAR(SUM(year1_total),'FM999G999G999G999G990D00'), p_size=>10, p_maxlength=>2000,
       p_attributes=>'disabled=true class="edit_money" data-total="year1"') as year1_total
      ,APEX_ITEM.text(4, TO_CHAR(SUM(year2_total),'FM999G999G999G999G990D00'), p_size=>10, p_maxlength=>2000,
       p_attributes=>'disabled=true class="edit_money" data-total="year2"') as year2_total
      ,APEX_ITEM.text(5, TO_CHAR(SUM(year3_total),'FM999G999G999G999G990D00'), p_size=>10, p_maxlength=>2000,
       p_attributes=>'disabled=true class="edit_money" data-total="year3"') as year3_total
      ,APEX_ITEM.text(6, TO_CHAR(SUM(year4_total),'FM999G999G999G999G990D00'), p_size=>10, p_maxlength=>2000,
       p_attributes=>'disabled=true class="edit_money" data-total="year4"') as year4_total
      ,APEX_ITEM.text(7, TO_CHAR(SUM(year5_total),'FM999G999G999G999G990D00'), p_size=>10, p_maxlength=>2000,
       p_attributes=>'disabled=true class="edit_money" data-total="year5"') as year5_total
from budget_collection_vw
So, to summarise: all the data-cell items get totalled to the data-subtotal item in the same row; and all the data-col items get totalled to the data-total item below the tabular form.
To do all the hard work, I’ve added the following code to my page’s Function and Global Variable Declaration:
function getSum (qry) {
  //get the sum over all items matching the given jQuery search criterion
  var t = 0;
  $(qry).each(function() {
    t += parseFloat($(this).val().replace(/,/g,''))||0;
  });
  return t;
}

function updateSubTotal (item) {
  // update a row-level subtotal
  // the items to add up are identified by data-cell="x"
  // the item to show the total is identified by data-subtotal="x"
  var cell = $(item).data("cell") //get the data-cell attribute
     ,rn = $(item).prop("id").split("_")[1]
     ,t = getSum("input[data-cell='"+cell+"'][id$='_"+rn+"']");

  // we need to temporarily enable then disable the subtotal
  // item in order for the change event to fire
  $("input[data-subtotal="+cell+"][id$='_"+rn+"']")
    .val(t.formatMoney())
    .prop("disabled",false)
    .trigger("change")
    .prop("disabled",true);
}

function updateTotal (item) {
  // update a column total
  var col = $(item).data("col") //get the data-col attribute
     ,t = getSum("input[data-col='"+col+"']");

  $("input[data-total="+col+"]")
    .val(t.formatMoney())
    .trigger("change");
}
In case you’re wondering, I’m re-using the formatMoney function here.
There’s a number of things happening here. On page load, we add a listener for changes to any input item that has a data-cell attribute; this calls updateSubTotal, which detects the row number for the triggering item, adds up all the values for any input item that has the same data-cell value; and puts the total in the input item with a matching data-subtotal attribute.
We also have a listener for changes to any item with a data-col class; when these are changed, updateTotal adds up any item with the same attribute, and puts the total in an item with attribute data-total.
The jQuery selector [id$='_"+rn+"'] makes sure that the row-level code only finds items ending with the given row number (i.e. '*_0001').
The benefit of this declarative approach is that it is much easier to re-use and adapt.
EDIT: fixed the change trigger so that I don’t need to call updateTotal from updateSubTotal.
Sending emails from the Oracle database can be both simply deceptively braindead easy, and confoundingly perplexingly awful at the same time. Easy, because all you have to do is call one of the supplied mail packages to send an email:
If you want more control over your emails you can use UTL_SMTP instead; this is what I’ve been using for the past few years because I like feeling in control (doesn’t everyone?). This is the package that APEX_MAIL is built on top of.
If you just don’t trust these high-level abstractions you can use UTL_TCP and interact directly with the mail server. I don’t know, maybe your mail server does some weird stuff that isn’t supported by the standard packages.
If you want to send attachments, you can build this yourself in UTL_SMTP or UTL_TCP, but it’s easier with APEX_MAIL which can send BLOBs. UTL_MAIL can send attachments but only up to 32K in size (half that for binary files which become base64 encoded).
Let’s make up a checklist of features supported out of the box (i.e. without requiring you to write non-trivial code) and see how they stack up:
APEX_MAIL
UTL_MAIL
UTL_SMTP
UTL_TCP
Attachments
Yes
Yes (<32K)
No*
No*
Asynchronous
Yes
No
No
No
Rate limited
Yes
No
No
No
Anti-Spam
No*
No*
No*
No*
SSL/TLS
Yes
No
No*
No*
Authentication
Yes
No
No*
No*
Features marked “No*”: these are not natively supported by the API, but generic API routines for sending arbitrary data (including RAW) can be used to build these features, if you’re really keen or you can google the code to copy-and-paste.
(Note: of course, you can add the Asynchronous and Rate limiting features to any of the UTL_* packages by writing your own code.)
Asynchronous
Calls to the API to send an email do not attempt to connect to the mail server in the same session, but record the email to be sent soon after in a separate session.
This provides two benefits:
It allows emails to be transactional – if the calling transaction is rolled back, the email will not be sent; and
It ensures the client process doesn’t have to wait until the mail server responds, which might be slow in times of peak load.
Anti-Spam
Sending an email within an organisation is easy; internal mail servers don’t usually filter out internal emails as spam. Sending an email across the internet at large is fraught with difficulties, which can rear their ugly heads months or years after going live. One day your server tries to send 100 emails to the same recipient in error, and all of a sudden your IP is blocked as a spammer and NO emails get sent, with no warning.
For the last two years I’ve been battling this problem, because my site allows my clients to broadcast messages to their customers and partners via email and SMS. The SMS side worked fine, but emails frequently went AWOL and occasionally the whole site would get spam blocked. Most emails to hotmail went into a black hole and I was always having to apologise to anyone complaining about not getting their emails – “You’re not using a hotmail address by any chance? ah, that’s the problem then – sorry about that. Do you have any other email address we can use?”
I added some rate-limiting code to ensure that my server trickled the emails out. My server was sending about 2,000 to 3,000 per month, but sometimes these were sent in short spikes rather than spread out over the month. My rate-limiting meant a broadcast to 200 people could take several hours to complete, which didn’t seem to bother anyone; and this stopped the “too many emails sent within the same hour” errors from the mail server (I was using my ISP’s mail server).
I managed to improve the situation a little by implementing SPF (Sender Policy Framework). But still, lots of emails went missing, or at least directly into people’s spam folders.
I looked into DKIM as well, but after a few hours reading I threw that into the “too hard basket”. I decided that I’d much prefer to outsource all this worry and frustration to someone with more expertise and experience.
Searching for an Email Gateway
I’ve been hosting my site on Amazon EC2 for a long time now with great results and low cost, and I’ve also been using Amazon S3 for hosting large files and user-uploaded content. Amazon also provides an Email Gateway solution called SES which seemed like a logical next step. This service gives 62,000 messages per month for free (when sent from an EC2 instance) and you just get charged small amounts for the data transfer (something like 12c per GB).
I started trying to build a PL/SQL API to Amazon SES but got stuck trying to authenticate using Amazon’s complicated scheme. Just to make life interesting they use a different encryption algorithm for SES than they do for S3 (for which I already had code from the Alexandria PL/SQL library). It was difficult because their examples all assumed you’ve installed the Amazon SDK.
It always rejected anything I sent, and gave no clues as to what I might be doing wrong. In the end I decided that what I was doing wrong was trying to work this low-level stuff out myself instead of reusing a solution that someone else has already worked out. A good developer is a lazy developer, so they say. So I decided to see what other email gateways are out there.
I looked at a few, but their costs were prohibitive for my teeny tiny business as they assumed I am a big marketing company sending 100,000s of emails per month and would be happy to pay $100’s in monthly subscriptions. I wanted a low-cost, pay-per-use transactional email service that would take care of the DKIM mail signing for me.
Mailgun
In the end, I stumbled upon Mailgun, a service provided by Rackspace. Their service takes care of the DKIM signing for me, do automated rate limiting (with dynamic ramp up and ramp down), it includes 10,000 free emails per month, and extra emails are charged at very low amounts per email with no monthly subscription requirement.
Other benefits I noticed was that it allows my server to send emails by two methods: (1) RESTful API and (2) SMTP. The SMTP interface meant that I was very quickly able to use the service simply by pointing my existing Apex mail settings and my custom UTL_SMTP solution directly to the Mailgun SMTP endpoint, and it worked out of the box. Immediately virtually all our emails were getting sent, even to hotmail addresses. I was able to remove my rate limiting code. Other bonuses were that I now had much better visibility of failed emails – the Mailgun online interface provides access to a detailed log including bounces, spam blocks and other problems. So far I’ve been using it for a few weeks, and of 2,410 emails attempted, 98.55% were delivered, and 1.45% dropped. The emails that were dropped were mainly due to incorrect email addresses in my system, deliberately “bad” test emails I’ve tried, or problems on the target mail servers. One email was blocked by someone’s server which was running SpamAssassin. So overall I’ve been blown away by how well this is running.
Once I had my immediate problem solved, I decided to have a closer look at the RESTful API. This provides a few intriguing features not supported by the SMTP interface, such as sending an email to multiple recipients with substitution strings in the message, and each recipient only sees their own name in the “To” field. My previous solution for this involved sending many emails; the API means that I can send the request to Mailgun just once, and Mailgun will send out all the individual emails.
Another little bonus is that Mailgun’s API also includes a souped-up email address validator. This validator doesn’t just check email addresses according to basic email address formatting, it also checks the MX records on the target domain to determine whether it’s likely to accept emails. For some domains (such as gmail.com and yahoo.com) I noticed that it even does some level of checking of the user name portion of the email address. It’s still not absolutely perfect, but it’s better than other email validation routines I’ve seen.
Note: Mailgun supports maximum message size of 25MB.
Email Validation Plugin
Mailgun also provide a jQuery plugin for their email address validator which means you can validate user-entered email addresses on the client before they even hit your server. To take advantage of this in Oracle Apex I created the Mailgun Email Validator Dynamic Plugin that you can use and adapt if you want.
PL/SQL API
If you follow me on twitter you are probably already aware that I’ve started building a PL/SQL API to make the Mailgun RESTful API accessible to Oracle developers. You can try it out for yourself by downloading from here if you want. The WIKI on Github has detailed installation instructions (it’s a little involved) and an API reference.
The API supports the following Mailgun features:
Email validation – does the same thing as the jQuery-based plugin, but on the server
My implementation of the Send Email API so far supports the following features:
MAILGUN_PKG
Attachments
Yes
Asynchronous
Yes
Rate limited
Yes*
Anti-Spam
Yes*
SSL/TLS
Yes, required
Authentication
Yes
Features marked “Yes*”: these are provided by the Mailgun service by default, they are not specific to this PL/SQL API.
I’m planning to add more features to the API as-and-when I have a use for them, or if someone asks me very nicely to build them. I’ll be pleased if you fork the project from Github and I welcome your pull requests to merge improvements in. I recommend reading through the Mailgun API Documentation for feature ideas.
If you use either of these in your project, please let me know as I’d love to hear about your experience with it.
If your Apex application import log shows something like this:
...PAGE 73: Transaction Lines Report
declare
*
ERROR at line 1:
ORA-00001: unique constraint (APEX_040200.WWV_FLOW_WORKSHEET_RPTS_UK)
violated
ORA-06512: at "APEX_040200.WWV_FLOW_API", line 16271
ORA-06512: at line 6
(this is on an Apex 4.2.4 instance)
This is due to a Saved Report on an Interactive Report that was included in the export, which conflicts with a different Saved Report in the target instance. The log will, conveniently, tell you which page the IR is on.
The solution for this problem is simple – either:
(a) Export the application with Export Public Interactive Reports and Export Private Interactive Reports set to No;
OR
(b) Delete the Saved Report(s) from the instance you’re exporting from.
You can find all Saved Reports in an instance by running a query like this:
select workspace
      ,application_id
      ,application_name
      ,page_id
      ,application_user
      ,report_name
      ,report_alias
      ,status
from APEX_APPLICATION_PAGE_IR_RPT
where application_user not in ('APXWS_DEFAULT'
                              ,'APXWS_ALTERNATIVE');
You can delete Saved Reports from the Application Builder by going to the page with the Interactive Report, right-click on the IR and choose Edit Saved Reports, then select the report(s) and click Delete Checked.
DISCLAIMER: this article is based on Early Adopter 1.
I’ve finally got back to looking at my reference TAPI Apex application. I’ve greatly simplified it (e.g. removed the dependency on Logger, much as I wanted to keep it) and included one dependency (CSV_UTIL_PKG) to make it much simpler to install and try. The notice about compilation errors still applies: it is provided for information/entertainment purposes only and is not intended to be a fully working system. The online demo for Apex 5.0 has been updated accordingly.
I next turned my attention to Apex 5.1 Early Adopter, in which the most exciting feature is the all-new Interactive Grid which may replace IRs and tabular forms. I have installed my reference TAPI Apex application, everything still works fine without changes.
I wanted my sample application to include both the old Tabular Forms as well as the new Interactive Grid, so I started by making copies of some of my old “Grid Edit” (tabular form) pages. You will find these under the “Venues” and “Event Types” menus in the sample application. I then converted the tabular form regions to Interactive Grids, and after some fiddling have found that I need to make a small change to my Apex API to suit them. The code I wrote for the tabular forms doesn’t work for IGs; in fact, the new code is simpler, e.g.:
PROCEDURE apply_ig (rv IN VENUES$TAPI.rvtype) IS
  r VENUES$TAPI.rowtype;
BEGIN
  CASE v('APEX$ROW_STATUS')
  WHEN 'I' THEN
    r := VENUES$TAPI.ins (rv => rv);
    sv('VENUE_ID', r.venue_id);
  WHEN 'U' THEN
    r := VENUES$TAPI.upd (rv => rv);
  WHEN 'D' THEN
    VENUES$TAPI.del (rv => rv);
  END CASE;
END apply_ig;
You may notice a few things here:
(1) APEX$ROW_STATUS for inserted rows is ‘I’ instead of ‘C’; also, it is set to ‘D’ (unlike under tabular forms, where it isn’t set for deleted rows).
(2) After inserting a new record, the session state for the Primary Key column(s) must be set if the insert might have set them – including if the “Primary Key” in the region is ROWID. Otherwise, Apex 5.1 raises No Data Found when it tries to retrieve the new row.
(3) I did not have to make any changes to my TAPI at all
Here’s the example from my Event Types table, which doesn’t have a surrogate key, so we use ROWID instead:
PROCEDURE apply_ig (rv IN EVENT_TYPES$TAPI.rvtype) IS
  r EVENT_TYPES$TAPI.rowtype;
BEGIN
  CASE v('APEX$ROW_STATUS')
  WHEN 'I' THEN
    r := EVENT_TYPES$TAPI.ins (rv => rv);
    sv('ROWID', r.p_rowid);
  WHEN 'U' THEN
    r := EVENT_TYPES$TAPI.upd (rv => rv);
  WHEN 'D' THEN
    EVENT_TYPES$TAPI.del (rv => rv);
  END CASE;
END apply_ig;
Converting Tabular Form to Interactive Grid
The steps needed to convert a Tabular Form based on my Apex API / TAPI system are relatively straightforward, and only needed a small change to my Apex API.
Select the Tabular Form region
Change Type from “Tabular Form [Legacy]” to “Interactive Grid”
Delete any Region Buttons that were associated with the Tabular form, such as CANCEL, MULTI_ROW_DELETE, SUBMIT, ADD
Set the Page attribute Advanced > Reload on Submit = “Only for Success”
Under region Attributes, set Edit > Enabled to “Yes”
Set Edit > Lost Update Type = “Row Version Column”
Set Edit > Row Version Column = “VERSION_ID”
Set Edit > Add Row If Empty = “No”
If your query already included ROWID, you will need to remove this (as the IG includes the ROWID automatically).
If the table has a Surrogate Key, set the following attributes on the surrogate key column:
Identification > Type = “Hidden”
Source > Primary Key = “Yes”
Also, if the table has a Surrogate Key, delete the generated ROWID column. Otherwise, leave it (it will be treated as the Primary Key by both the Interactive Grid as well as the TAPI).
Set any columns Type = “Hidden” where appropriate (e.g. for Surrogate Key columns and VERSION_ID).
Under Validating, create a Validation:
Editable Region = (your interactive grid region)
Type = “PL/SQL Function (returning Error Text)”
PL/SQL = (copy the suggested code from the generated Apex API package) e.g.
Under Processing, edit the automatically generated “Save Interactive Grid Data” process:
Target Type = PL/SQL Code
PL/SQL = (copy the suggested code from the generated Apex API package) e.g.
I like how the new Interactive Grid provides all the extra knobs and dials needed to interface cleanly with an existing TAPI implementation. For example, you can control whether it will attempt to Lock each Row for editing – and even allows you to supply Custom PL/SQL to implement the locking. Note that the lock is still only taken when the page is submitted (unlike Oracle Forms, which locks the record as soon as the user starts editing it) – which is why we need to prevent lost updates:
Preventing Lost Updates
The Interactive Grid allows the developer to choose the type of Lost Update protection (Row Values or Row Version Column). The help text for this attribute should be required reading for any database developer. In my case, I might choose to turn this off (by setting Prevent Lost Updates = “No” in the Save Interactive Grid Data process) since my TAPI already does this; in my testing, however, it didn’t hurt to include it.
Other little bits and pieces
I found it interesting that the converted Interactive Grid includes some extra columns automatically: APEX$ROW_SELECTOR (Type = Row Selector), APEX$ROW_ACTION (Type = Actions Menu), and ROWID. These give greater control over what gets included, and you can delete these if they are not required.
Another little gem is the new Column attribute Heading > Alternative Label: “Enter the alternative label to use in dialogs and in the Single Row View. Use an alternative label when the heading contains extra formatting, such as HTML tags, which do not display properly.”.
Demo
If you’d like to play with a working version of the reference application, it’s here (at least, until the EA is refreshed) (login as demo / demo):
For a number of years now I’ve been using LetsEncrypt to provide free SSL certificates for the Apex applications I provide. These certificates last for 90 days and are renewed automatically by a simple script on my server.
Each LetsEncrypt certificate can cover multiple subdomains. They don’t currently support wildcard domains (e.g. *.example.com) but they are planning to add this next year (2018).
To install LetsEncrypt I ran the following on my Amazon Linux instance (note – this is my web server, not my database server):
cd /opt
git clone http://github.com/letsencrypt/letsencrypt
cd letsencrypt
./letsencrypt-auto -v --debug
(when prompted at the last step I typed “c” to cancel the subsequent steps)
It wasn’t easy at first because I got a number of errors which I’d google (or search the community forum) and eventually find reasonable answers. I’ve had to reinstall a number of times, as the OS is patched regularly and certbot is updated from time to time.
I use Apache to provide about a dozen virtual hosts and therefore the automated installation option didn’t work for me. Instead, I’ve got lines like these in each VirtualHost:
This generates all the keys and certificates and stores them locally. No private keys ever leave the server. This command is using SAN to combine multiple subdomains in one certificate. I run this command again separately for each domain.
To renew all my certificates I run the following command as root:
/opt/letsencrypt/letsencrypt-auto renew -n --no-self-upgrade
service httpd restart
This will automatically skip any certificates that are not yet due to expire. I’ve put the above script in a file which is run by cron on a monthly basis.
0 20 1 * * /path-to-script/renewall.sh
To get usage info on the options:
/opt/letsencrypt/letsencrypt-auto --help
Since it’s free, one cannot expect support from LetsEncrypt directly if there are issues; however, there is an active LetsEncrypt support community which can be helpful at times.
But it’s certainly made a big difference to my bottom line, and provided a bit of peace-of-mind to my users.
So you’ve built an APEX application to solve a problem for one client, or one department, or just yourself – and you think it might be useful for others as well. How do you make that application available for other users, departments, or companies to reuse, while ensuring each sees only their own data and cannot mess around with others’ data?
Architecting a Multi-Tenant Application
To make your application multi-tenant you have a few options.
Option #1. Copy the application to another workspace/schema, another Pluggable Database (in Oracle 12c+) or another database server entirely.
Option #2. Modify your data model to allow completely independant sets of data to co-exist in the same physical tables (e.g. a security_group_id column that allows the database to discriminate data for each tenant).
The desirable properties of a multi-tenant system are as follows:
a. Tenant isolation – no tenant sees data for another tenant; no tenant can affect the app’s behaviour for another tenant; protect against “noisy neighbours” (i.e. those which impact system capacity and performance).
b. Administration – ability to backup/recover all data for a single tenant; ability to give a degree of control to each tenant (self service).
c. Maintainability – simplicity of deploying enhancements and bug fixes for all tenants, or for one tenant at a time (e.g. rolling upgrades).
d. Scalability – ability to easily add more tenants, ability to add more capacity for more tenants.
Some of these properties are more easily and effectively achieved with option #1 (separate servers or schemas for each tenant), such as Isolation and Administration. Other properties are more easily and effectively achieved with option #2 (discriminator column) such as Maintainability and Scalability. This is a gross generalisation of course; there are many solutions to this design problem each with many pros and cons.
Some inspiration may be gained from examining how Oracle Application Express achieves this goal: multi-tenant has been baked into the product, via its concept of Workspaces. Each tenant can be given their own workspace in APEX and are able to build and deploy applications in isolation from other workspaces. Internally, APEX maintains a unique security_group_id for each workspace. This works very well – a single Oracle database instance can serve thousands or tens of thousands of workspaces.
It should be noted that a benefit of pursuing Option #2 is that it does not necessarily preclude using Option #1 as well, should the need arise later on – for example, to provide more capacity or better performance in the presence of more demanding tenants. For this reason, plus the fact that it’s much easier to maintain and enhance an application for all users at once if they’re colocated, I prefer Option #2.
The core element to implementing a single-schema multi-tenant application is the addition of a tenant identifier added to most tables in the data model. A common convention for this column is to be a surrogate key ID named security_group_id. This ID must refer to something so we need a simple data model for security groups:
First, we need a row to represent each tenant in a table that has security_group_id as its primary key:
create sequence security_group_id_seq;

create table security_groups
( security_group_id number not null
, name varchar2(100) not null
, active_ind varchar2(1) default 'Y'
);
Next, whenever someone logs into the application it must identify what their security group ID is; in order to allow a single user to access more than one tenant (i.e. so they don’t need to create new logins for each tenant, if they work for more than one client or department) we will design a table that will allow a user to be a member of any number of security groups:
create table security_group_members
( security_group_id number not null
, app_user varchar2(200) not null
, last_login date
, active_ind varchar2(1) default 'Y'
);
The last_login will be updated whenever the user logs in; we will also use it to automatically select their most recent group when they login. The active_ind attribute will be used if we want to temporarily (or permanently) restrict someone from a group, without having to actually delete the record.
After they login, we might want to assign different roles to different users – e.g. we might want an “Administrator” role who can see and update everything in the system; and we might want to give a “Readonly” or reporting role to someone who only needs to see the data but are not allowed to make any updates. To support this, we need two tables – one to represent each type of role, and one to indicate for each member what role(s) they have for a particular security group.
create table security_roles
( role_code varchar2(100) not null
, name varchar2(100) not null
, active_ind varchar2(1) default 'Y'
);

create table security_group_roles
( security_group_id number not null
, app_user varchar2(200) not null
, role_code varchar2(100) not null
, active_ind varchar2(1) default 'Y'
);
The full DDL for these tables, including all the constraints, may be viewed here: security_tables.sql.
We have an active_ind attribute on both these tables – this way we can deactivate a role for a single user, or for all users at one go.
Note: optimising this data model with appropriate indexes has been left as an exercise for the reader
We can prime the tables with some basic details like this:
insert into security_roles (role_code,name) values ('ADMIN','Admin');
insert into security_roles (role_code,name) values ('EDITOR','Editor');
insert into security_roles (role_code,name) values ('READONLY','Readonly');

insert into security_groups (security_group_id,name)
  values (security_group_id_seq.nextval,'Default');

insert into security_group_members (security_group_id,app_user)
  values (security_group_id_seq.currval,'JEFF');

insert into security_group_roles (security_group_id,app_user,role_code)
  values (security_group_id_seq.currval,'JEFF','ADMIN');
We need a database package to setup an APEX session using the data in these tables.
create or replace package security_pkg is

procedure init
  (app_user          in varchar2 := null
  ,security_group_id in number := null
  ,apex              in boolean := true
  );

end security_pkg;
/
The init procedure is called after a user is authenticated. If app_user is null it uses v('APP_USER'). It queries the relevant tables to determine if the user is active for the selected security group, or, if that parameter is left null, it gets the security group they most recently logged in to. The intention is that later we will give them the ability to “switch” to another security group within the app, if they have access to multiple tenants.
The full source code for the package may be viewed here: security_pkg.sql. The important procedure at this point is init.
create or replace package body security_pkg is

procedure sctx
  (attr in varchar2
  ,val  in varchar2
  ,apex in boolean) is
begin
  if apex then
    dbms_session.set_context
      (namespace => 'CTX'
      ,attribute => attr
      ,value     => val
      ,client_id => v('APP_USER') || ':' || v('SESSION'));
  else
    dbms_session.set_context
      (namespace => 'CTX'
      ,attribute => attr
      ,value     => val
      ,username  => user);
  end if;
end sctx;

procedure init
  (app_user          in varchar2 := null
  ,security_group_id in number := null
  ,apex              in boolean := true
  ) is
  cursor c
    (security_group_id in number
    ,app_user          in varchar2
    ) is
    select x.*
    from   security_group_members x
    join   security_groups g
    on     g.security_group_id = x.security_group_id
    where  x.app_user = c.app_user
    and    (x.security_group_id = c.security_group_id
            or c.security_group_id is null)
    and    x.active_ind = 'Y'
    and    g.active_ind = 'Y'
    order by x.last_login desc nulls last;
  r c%rowtype;
begin
  open c
    (security_group_id => security_group_id
    ,app_user          => coalesce(app_user, v('APP_USER'))
    );
  fetch c into r;
  close c;

  sctx('APP_USER', r.app_user, apex);
  sctx('SECURITY_GROUP_ID', r.security_group_id, apex);

  if apex
  and r.app_user is not null
  and r.security_group_id is not null then
    update security_group_members m
    set    last_login = sysdate
    where  m.security_group_id = r.security_group_id
    and    m.app_user = r.app_user;
  end if;

end init;

end security_pkg;
/
This package uses a globally accessible context (created by a user with CREATE ANY CONTEXT system privilege):
create context ctx using myschema.security_pkg accessed globally;
Since we set the client_id in the call to dbms_session.set_context that matches that set by APEX for each session, the context values will be automatically loaded for each database call from a valid APEX session. We can then use very efficient calls to sys_context('CTX','xyz') throughout the application’s PL/SQL and SQL, including views.
If we need to run code directly on the database, we can set up the security context for the session by calling security_pkg.init with apex=>false. This uses the username parameter of dbms_session.set_context instead of client_id (reference).
Side note: in APEX 5+ you might consider using APEX’s context to get APP_USER; however, this has the disadvantage that all database procedures that need to interact with the data must first set up an APEX session before they can work. The method I’ve used here allows batch jobs, for example, to simply call security_pkg.init with the user and security group ID directly.
APEX Authentication Scheme
We need to get APEX to set up the user’s context after they login; to do this we simply add the following call to the Post-Authentication Procedure Name attribute of the application’s current authentication scheme:
schemaname.security_pkg.init
For more details on how Oracle application contexts work within APEX, refer to my earlier article, “APEX and Application Contexts”.
APEX Authorization Schemes
This step is not strictly part of the multi-tenant feature; I’ve included this step here as part of the implementation of the role-based security system we have created.
We can allow/disallow access to features of the APEX application according to the user’s roles in our security model, by creating Authorization Schemes. For example, we can create one to restrict features to Administrators only with a scheme like this:
Scheme Type = PL/SQL Function Returning Boolean PL/SQL Function Body = return security_pkg.user_has_role('ADMIN');
I will typically create authorization schemes for each role; sometimes I’ll create a scheme that combines conditions on multiple roles (e.g. if a feature needs to be visible to more than one role).
The source code for the user_has_role function may be found in security_pkg.sql.
Discriminator Column
Now that the security data model is in place, we shall add the security_group_id column to all the tables in the application’s data model. In some cases you might decide to just add the column to the core tables of the data model; however, it’s more convenient to standardise and add it to all tables. You will find, however, that it is a requirement for any tables with any natural keys (i.e. non-surrogate primary keys, or unique constraints on user-entered data) because these will need to have the discriminator column added later on.
1. Set up a session
exec security_pkg.init('JEFF',apex=>false);
2. Add security_group_id column to the table
alter table mytable
  add security_group_id integer
  default sys_context('CTX','SECURITY_GROUP_ID') not null;

alter table mytable
  add constraint mytable$secfk
  foreign key (security_group_id)
  references security_group (security_group_id);
In my security package I have defined a simple VPD policy that will apply to all my tables. It returns a single, static string which will be added to any queries on the tables, to ensure that each user will only see rows for their security group.
function vpd_policy
  (object_schema in varchar2
  ,object_name in varchar2
  ) return varchar2 is
begin
  return q'[
    security_group_id = sys_context('CTX','SECURITY_GROUP_ID')
    ]';
end vpd_policy;
I set update_check to true to ensure that users cannot try to override the security group ID with any insert or update. Since the policy function returns the same string regardless of which user or session is executing it, I’ve also set static_policy to true which may give a small performance benefit.
Poor Man’s VPD
If you don’t have the Enterprise Edition of Oracle you might need to consider an alternative method – “Poor Man’s VPD”. This generally entails restricting access to all base tables (e.g. moving them to another schema) and only allowing queries and DML via a view for each table which incorporates the necessary predicate on security_group_id.
I’ve used the following procedure to convert a table to a view; it renames the table to add a suffix ($B) and creates a view (minus the security_group_id) on the same table, along with the necessary predicate, plus the with check option for good measure.
procedure table2view (table_name in varchar2) is
  l_table_name varchar2(30);
  l_columns varchar2(32767);
begin
  l_table_name := upper(substr(table_name,1,30-length('$B')) || '$B');
  begin
    execute immediate 'alter table ' || table_name
      || ' rename to ' || l_table_name;
  exception
    when others then
      -- if the table doesn't exist, it was probably
      -- already converted; so we don't error out
      -- and recreate the view
      if sqlcode!=-942 then
        raise;
      end if;
  end;
  for r in (select column_name
            from   user_tab_columns
            where  table_name = table2view.l_table_name
            and    column_name != 'SECURITY_GROUP_ID'
            order by column_id) loop
    if l_columns is not null then
      l_columns := l_columns || ',';
    end if;
    l_columns := l_columns || 'x.' || lower(r.column_name);
  end loop;
  execute immediate replace(replace(replace(q'[
    create or replace force view #VIEW#
    as select #COLUMNS#
       from #TABLE# x
       where x.security_group_id = sys_context('CTX','SECURITY_GROUP_ID')
       with check option
    ]','#VIEW#',table_name)
      ,'#COLUMNS#',l_columns)
      ,'#TABLE#',l_table_name);
end table2view;
To stop users from inserting or updating the security_group_id column, I’ve used a trigger that checks the before and after values on each insert, update and delete:
create trigger MYTABLE$TRG
before insert or update or delete on MYTABLE
for each row
begin
  if updating or deleting then
    security_pkg.validate
      (security_group_id => :old.security_group_id);
  end if;
  if inserting then
    :new.security_group_id := sys_context('CTX','SECURITY_GROUP_ID');
  end if;
  if inserting or updating then
    security_pkg.validate
      (security_group_id => :new.security_group_id);
  end if;
end MYTABLE$TRG;
I wrote a simple procedure to generate this trigger for each table, after adding the security_group_id column. Source: convert2multitenant.sql
Unique Constraints
There is one more hurdle to jump for this solution to work: uniqueness constraints. If one tenant tries to insert or update a row that collides with a value already committed for a different tenant, the uniqueness constraint will trap them. Therefore, we need to add security_group_id to all unique constraints (and any unique indexes as well, if any were created independently of any constraint). We would probably make an exception for surrogate keys, since these should already be generated by a globally unique method and should not be updatable by users. These could still cause a problem in the case that a tenant needs to import data from a different database instance, if any keys happen to collide; this may be a good argument for using GUIDs for generating surrogate keys instead of a sequence.
To convert the unique constraints to include security_group_id I’ve used the following procedure. If it is called with just the table name, it will attempt to convert all Unique constraints on the table. If it is called with the name of a particular constraint, it will attempt to convert just that one constraint (I use this for primary key constraints that need to be converted).
procedure fix_unique_constraint
  (table_name in varchar2
  ,constraint_name in varchar2 := null) is
  l_ddl varchar2(32767);
begin
  for r in (
    select c.table_name, c.constraint_name
          ,decode(c.constraint_type
                 ,'U','unique'
                 ,'P','primary key') as constraint_type
          ,(select listagg('"'||cc.column_name||'"',',')
                   within group (order by position)
            from   user_cons_columns cc
            where  cc.constraint_name = c.constraint_name
            and    cc.table_name = c.table_name
            and    cc.column_name != 'SECURITY_GROUP_ID'
           ) as column_list
    from user_constraints c
    where c.table_name = fix_unique_constraint.table_name
    and ((fix_unique_constraint.constraint_name is null
           and c.constraint_type = 'U')
         or c.constraint_name = fix_unique_constraint.constraint_name)
    ) loop

    -- drop the constraint

    l_ddl := 'alter table "' || r.table_name
      || '" drop constraint "' || r.constraint_name || '"';

    dbms_output.put_line(l_ddl);
    execute immediate l_ddl;

    -- recreate the constraint

    l_ddl := 'alter table "' || r.table_name
      || '" add constraint "' || r.constraint_name
      || '" ' || r.constraint_type
      || ' (security_group_id,' || r.column_list || ')';

    dbms_output.put_line(l_ddl);
    execute immediate l_ddl;

  end loop;
end fix_unique_constraint;
Note: one scenario this procedure fails to cover is where the constraint is based on an index of the same name that was created prior to the constraint; in that case, the constraint will not drop the index, causing the add constraint to fail when it tries to recreate the index.
Referential Constraints
In my case, the data model is replete with surrogate keys based on sequences, so we don’t need to worry about adding security_group_id to the primary key constraints. In cases where we do, we would also need to consider referential constraints. If a foreign key refers to a constraint to which we have just added security_group_id, we need to update the foreign key constraint to include it as well.
Writing this as an automated procedure is left as an exercise for the reader. This process would entail dropping all foreign key constraints that refer to the table, dropping the primary key constraint, recreating the primary key constraint with the addition of security_group_id, and then recreating the foreign keys, adding security_group_id to each.
Summary
This article describes a simple method to take an existing data model in an Oracle schema supporting an Oracle Application Express application and convert it to one that supports multiple tenants. It does this by adding a discriminator column (security_group_id) to each table in the data model, with a referential constraint to a simple user security data model.
We use triggers and Virtual Private Database (either Oracle’s builtin Row Level Security feature, or by rolling our own by hiding the tables behind views) to ensure tenant isolation for queries, inserts, updates and deletes. Only minor changes to the existing codebase and APEX application were required for all of this to work.
I hope this was an interesting read. Your comments or constructive criticism are (as always) welcome.
I had a column in an editable interactive grid based on a Select List, which takes valid values from a table that supports “soft delete” – i.e. records could be marked as “deleted” without affecting existing references to those deleted records.
The SQL Query for the LOV was like this (my example is a view on a reference table of school “year levels”):
select name, id from year_levels_vw
where deleted_ind is null
order by sort_order
The problem is that if a year level is marked as deleted, the select list will not include it due to the where clause; since Display Extra Values is set to “Yes”, the item on the page will instead show the internal ID which is not very useful to the user. Instead, I want to show the name but appended with a string to show it has been deleted:
select name
       || case when deleted_ind = 'Y' then ' (DELETED)' end
       as disp_name, id
from year_levels_vw
order by deleted_ind nulls first, sort_order
So now the select list shows the name, even if it has been deleted. However, once users start using this system and they delete some year levels, each select list will include all the deleted values, even if they will never be used again. We’d prefer to only include a deleted value IF it is currently used by the record being viewed; otherwise, we want to omit it from the list.
If this was an APEX item in a single-record edit form, I’d simply change the SQL Query for the LOV to:
select name
       || case when deleted_ind = 'Y' then ' (DELETED)' end
       as disp_name, id
from year_levels_vw
where deleted_ind is null or id = :P1_FROM_YEAR_LEVEL_ID
order by deleted_ind nulls first, sort_order
This way, the select list will only include the deleted year level if the underlying item was already set to that deleted ID. But we are now using an Interactive Grid – there is no page item to refer to.
The method I’ve used to solve this is to take advantage of the Cascading LOV feature in order to allow the query to refer to the value of the column. The SQL Query for the LOV on my Interactive Grid is:
select name
       || case when deleted_ind = 'Y' then ' (DELETED)' end
       as disp_name, id
from year_levels_vw
where deleted_ind is null or id = :FROM_YEAR_LEVEL_ID
order by deleted_ind nulls first, sort_order
Now, we need to make sure that “FROM_YEAR_LEVEL_ID” is available to the query, so we need to put it in the Items to Submit attribute. To make this attribute available, however, we must set Cascading LOV Parent Column(s) to something; I set it to the PK ID of the table, or some other column which doesn’t get changed by the user and isn’t actually referred to in the LOV Query.
Now, records not referring to a deleted value show only valid values:
And records that refer to a deleted value include the deleted value in the list, as desired:
It should be noted that the design of the select list means that the user is allowed to save changes to the record while preserving the reference to the deleted year level. This is desired, in this case; if it wasn’t, however, I’d consider putting a validation on the page to stop the record being saved unless the user changes it to a valid value.
P.S. Concerned parents should note that this example was just testing the ability to delete a record from a database, and I’d just like to make it totally clear that there are no plans by the department to eliminate year 7 from schools. Honest!
APEX_EXPORT – new package with supported methods for exporting APEX applications and other scripts into a CLOB: get_application, get_workspace_files, get_feedback, get_workspace
APEX_JWT – new package for JSON Web Tokens – encode, decode, validate
APEX_SESSION – new procedures: create_session, delete_session, attach, detach
What I’m particularly looking for is a good reference for the interactiveGrid API. Hopefully they’ll add this soon. There is a reference for a “grid” widget but that is not the API for interactive grids. I notice there are APIs for actions and model which are relevant to interactive grids.
If you have an ordinary Oracle APEX form with the standard Automatic Row Fetch process, and the page has an optional item with a default value, APEX will set the default on new records automatically. However, if the user queries an existing record, Oracle APEX will also fill in a missing value with the default value. This might not be what is desired – if the user clears the value they would expect it will stay cleared.
If you only want the default to be applied for new records, change the attribute on the item so that the default is only applied to new records:
Set Default Value Type to PL/SQL Expression
Set Default value to something like: case when :P1_ID is null then 'xyzzy' end
I needed to get a list of all the tabular forms in my application along with which table they were based on. This query did the trick:
select page_id
      ,attribute_02 as data_source
      ,page_name
      ,region_name
      ,attribute_03 as key_column
from   apex_application_page_proc
where  application_id = <my app id>
and    process_type_code = 'MULTI_ROW_UPDATE'
order by 1, 2;
I was working on an application in an APEX instance that was not configured for email (and would not be), but a number of interactive reports were allowing users to use the “Subscription” or the “Download as Email” features. If they tried these features, those emails would just go into the APEX mail queue and never go anywhere, so I needed to turn these off.
I listed all the interactive reports that need fixing with this query:
select page_id
      ,region_name
      ,show_notify
      ,download_formats
from apex_application_page_ir
where application_id = <my app id>
and (show_notify = 'Yes' or instr(download_formats,'EMAIL') > 0);
Sometimes my customers need to be able to get a direct link to a record in their APEX application which they can share with others (e.g. to publish it on a website, or send by email to a colleague).
They don’t want people to be able to easily “guess” the link (so it needs to have some degree of randomness and complexity), but it’s not so sensitive that if someone somehow gets the link by mistake it won’t be cause for alarm. They would like to be able to invalidate the link at any time, so if they send the link and then decide they don’t want people viewing the record anymore, they can mark it as “expired”.
Task 1. Generate the link
We have a table to which we want to create links for each record. It already has a surrogate key called id based on a simple sequence, so on its own this is not suitable for our link (we don’t want users just adding 1 to the id and iterating through all values to look up other records). Add a column to the table with a unique constraint:
Update existing rows (if any) and make the column not null:
update mytable
set link_code = id || '-' || dbms_random.string('x',10)
where link_code is null;

alter mytable modify link_code not null;
Set its value using the following expression (e.g. this could be done in a page process, in your table API, or a table trigger):
create trigger bi_mytable before insert on mytable for each row
begin
  :new.link_code := :new.id || '-' || dbms_random.string('x',10);
end;
Note that the random string is more than likely to be unique for each record; but we prepend the unique ID as well which guarantees it to be unique. In addition, if a user sends us a link saying “this didn’t work”, we can visually parse it to see what the record ID was they were trying to access. This is needed because our design allows users to overwrite link_code (e.g. to expire the link).
Task 2. Build an APEX link page
Create a page (in my example, this will be page 100) to be the link resolver. It won’t have any complex regions or show any information, but will merely redirect the user to the page with the actual data (page 10, in my example).
Set it up as follows:
Alias: GO
Page Access Protection: Unrestricted
Region with title “Record not found”
Hidden item: P100_REF
Session State Protection: Unrestricted
Note: if the target page that shows the record is Public (i.e. the people getting the link cannot login to the application), this link resolver page will also need to be public – i.e. set Authentication to Page Is Public. On the other hand, if the target record is only available to authenticated users, the link resolver page should be restricted to authenticated users as well.
Add a PL/SQL Process that runs Before Header, with the following code:
declare
  l_id number;
begin

  select x.id into l_id
  from mytable x
  where x.link_code = :P100_REF;

  -- requires APEX 5.1 or later
  apex_util.redirect_url(
    apex_page.get_url
      (p_page        => 10
      ,p_clear_cache => 10
      ,p_items       => 'P10_ID'
      ,p_values      => l_id));

/*
  -- use this on APEX 5.0 or earlier
  apex_util.redirect_url(
    apex_util.prepare_url(
      p_url => 'f?p='
            || :APP_ID
            || ':10:'
            || :APP_SESSION
            || ':::10:P10_ID:'
            || l_id));
*/

exception
  when no_data_found then
    null;
end;
If the page gets a valid value for P100_REF, it will find the ID for the corresponding record and redirect the user to the page showing that record. If the link is invalid or expired, the page will not redirect but will show a “record not found” message.
Task 3. Show the link
We show the generated link on a page with an ordinary Text item.
Create an item on the page with the following properties:
Name: P10_LINK
Custom Attributes (or HTML Form Element Attributes): readonly
Session State Protection: Unrestricted
We need to generate the link using the page’s domain name, which (at least in some cases) we don’t know ahead of time. To do this, we need to get the page’s URL including host, port and path.
Create a dynamic action on page load. Set its condition so it only fires if P10_LINK_CODE is not null (if it doesn’t already exist, create P10_LINK_CODE as a hidden item based on the database column LINK_CODE).
The dynamic action needs two True Actions – firstly, Execute Javascript:
This dynamic action constructs the link using the current window’s URL including path (which includes the trailing “/apex/f” or “/ords/f“) and query string (“?p=...“).
When the user clicks the item, we want it to automatically select the entire link and copy it to their clipboard. To show this has happened, we show the word “Copied” on the screen.
Create a Dynamic Action on the item – Event: Click
Users who are looking at the record get a “Share Link” in a convenient item that they can copy-and-paste into emails or web pages. If you need to expire a link, simple update the record with a new link_code and the old links will no longer work.
Normally, in a report you can add a checkbox to select records like this:
select apex_item.checkbox2(1,x.id) as sel
      ,x.mycol
      ,...
from mytable x
And process the selected records using a process like this:
for i in 1..apex_application.g_f01.count loop
  l_id := apex_application.g_f01(i);
  -- ... process ...
end loop;
Since we have set the value of the checkbox to the record ID we can just get that ID from the resulting g_f01 array. What if we need multiple columns in our processing? There are a few approaches we could use:
Option 1. Re-query the table to get the corresponding data for the record ID
This is possible as long as the record ID is a unique identifier for the results in the report. A downside is that this involves running an extra query to get the corresponding data which might add a performance problem. An advantage is that the query can bring back as much data as we need – so if we need more than, say, 6 or 7 columns, this would be a reasonable approach.
Option 2. Concatenate the extra data into the checkbox value
For example:
select apex_item.checkbox2(1, x.col1 || ':' || x.col2) as sel
      ,x.mycol
      ,...
from mytable x
This requires parsing the value in the process, e.g.:
for i in 1..apex_application.g_f01.count loop
  l_buf := apex_application.g_f01(i);
  l_col1 := substr(l_buf, 1, instr(l_buf,':')-1);
  l_col2 := substr(l_buf, instr(l_buf,':')+1);
  -- ... process ...
end loop;
Option 3. Add extra hidden items to hold the data
select apex_item.checkbox2(1,rownum)
       || apex_item.hidden(2,rownum)
       || apex_item.hidden(3,col1)
       || apex_item.hidden(4,col2)
       as sel
      ,x.mycol
      ,...
from mytable x
Note: using “rownum” like this allows selecting the data from the row in the report, even if the underlying view for the report has no unique values that might be used.
Processing involves getting the selected rownums from the checkbox, then searching the hidden item (#2) for the corresponding rownum. This is because the g_f01 array (being based on a checkbox) will only contain elements for the selected records, whereas the g_f02, g_f03, etc. arrays will contain all elements from all records that were visible on the page.
for i in 1..apex_application.g_f01.count loop
  for j in 1..apex_application.g_f02.count loop
    -- compare the ROWNUMs
    if apex_application.g_f02(j) = apex_application.g_f01(i)
    then
      l_col1 := apex_application.g_f03(j);
      l_col2 := apex_application.g_f04(j);
      -- ... process ...
    end if;
  end loop;
end loop;
This approach helped when I had a report based on a “full outer join” view, which involved multiple record IDs which were not always present on each report row, and I had multiple processes that needed to process based on different record IDs and other data, which would have been too clumsy to concatenate and parse (as per option #2 above).
A user sent me a CSV they had downloaded from my APEX application and then subsequently updated. I needed to know which database column was the source for each column in the spreadsheet; this was not as simple as you might think because the labels from this report (that has a bewilderingly large number of columns) were quite often very different from the database column name.
To map their spreadsheet columns to database columns I used this simple query:
select x.interactive_report_id, x.report_label, x.column_alias
from apex_application_page_ir_col x
where x.application_id = <my app id>
and x.page_id = <my page id>
order by x.interactive_report_id, x.report_label;
This is an article I wrote quite some time ago and put “on ice” until I completed the client project it was related to. However, for unrelated reasons the project was significantly delayed and later rebooted with an updated set of requirements, which no longer require Oracle Workspace Manager. This means I’m unable to add a triumphant postscript saying “this was a great success and it’s being used to this day”. Instead, I’m adding this preamble to say “this was a very interesting feature of Oracle I learned but didn’t quite get to use, but hopefully someone will find it useful”.
Oracle Workspace Manager (OWM) is a feature of the Oracle database that was built back in the 8i days and installed in Oracle by default since 9i. As described by Tim Hall, it allows multiple transactionally consistent environments to exist within one database.
Confusing Terms… Don’t confuse OWM with Oracle APEX workspaces, or with Analytic Workspace Manager for Oracle OLAP.
OWM allows the developer to take a leap over the complexities involved in a number of use cases, such as:
Savepoints – a snapshot of a point in time
Workspaces – a private area for modifications that are not visible to normal users
Row History – store a history of every change for every record
Valid Time – support date/time range validity for each record
The Row History use case is similar to using Flashback Query which is a more modern feature of the database; however, since it can be enabled or disabled individually for each table, it may require less storage space to support querying back as far as the user would like in time.
The Valid Time use case allows your users to set a date/time range on each record; multiple versions of a unique row can be created with non-overlapping date ranges; updates can be done within the context of a given date/time range, which will cause rows that span the boundary of the range to be split into multiple versions. I haven’t tried this myself but it looks like a powerful feature.
Note: the default workspace for a user session is called “LIVE“, and the default savepoint is “LATEST“.
One example of using savepoints is that a user could create a savepoint, make changes, go back and view the database as of the savepoint, and can rollback all changes to a savepoint. They can also run an API command (dbms_wm.SetDiffVersions) to generate a differences report which shows all the inserts, updates, and deletes that have occurred since a savepoint.
An example of using workspaces is where a user could create one or two workspaces, each representing a different scenario. The user can jump back and forth between the scenarios and the “live” workspace (which is the default). They can edit any of these workspaces. Changes made by other users to the “live” workspace may, optionally, be automatically propagated into a workspace. Similarly to savepoints, the user can get a differences report between any workspace (including the “live” workspace). In addition, the user can create and view savepoints and additional workspaces within a workspace – OWM maintains a hierarchy of workspaces.
If the user is not happy with their scenario, they can simply delete the workspace and the live data is not affected.
If they are happy with their changes in a workspace, they can choose to do a Merge – which attempts to effect all the inserts, updates and deletes that were made in the workspace to its parent workspace (e.g. the “live” workspace if that was the source). If any change to a row would conflict with a change that another user made to the same row in the parent workspace, the merge stops and the user may be prompted to resolve the conflicts (i.e. for each row, the user can decide to refresh their workspace with the updated data in the parent, or they can force their workspace’s change onto the parent).
I suspect OWM was once known (or internally referred to) as “Long Transactions” or something like that, probably because of its user workspace and merging features. You can see the remnants of this old name in the documentation – many of the document URLs start with “long”. Also, note the title of this slide deck by an Oracle product manager: “Long Transactions with Oracle Database Workspace Manager Feature”.
The features of OWM only affect the tables that you explicitly Enable Versioning on via the API (DBMS_WM).
Limitations/Restrictions of Workspace Manager
If you are looking into using OWM, you must read the Intro to Workspace Manager in the docs. Make sure to review the restrictions that apply, such as:
Each version-enabled table must have a primary key.
If a parent table is version-enabled, each child table must also be version-enabled (but the opposite does not apply).
Referential integrity constraints MUST refer to the primary key in the parent table.
Primary key values in a parent table cannot be updated.
Only row-level triggers are supported – no per-statement triggers.
SQL MERGE statements are not allowed (attempts to do so results in “ORA-01400 cannot insert NULL into WM_VERSION”).
RETURNING clause is not supported (for INSERT or UPDATE statements).
Row-level security policies (VPD) are not enforced during workspace operations (such as Merge Workspace, and Rollback to Savepoint).
Materialized Views on a version-enabled table can only use the REFRESH COMPLETE method; e.g. no FAST or ON COMMIT.
Table names cannot be longer than 25 characters.
Column names cannot be longer than 28 characters.
Trigger names cannot be longer than 27 characters.
Some reserved words and characters apply, e.g. column names cannot start with WM$ or WM_.
Most DDL operations cannot be run directly on a version-enabled table (see below).
There are some other restrictions, so make sure to review the intro document carefully and consider the ramifications of each limitation for your particular situation.
I’ve used this simple script to do some basic checks on a table before I enable it for versioning: check_table_for_owm.sql
Database schema changes made by OWM
Internally, when you version-enable a table (e.g. MYTABLE), OWM makes a number of changes to your schema as follows:
Renames MYTABLE to MYTABLE_LT, for internal use only
Adds a number of grants on the object to WMSYS and WM_ADMIN_ROLE
Adds some extra OWM-specific columns (with names prefixed with WM_) and indexes to MYTABLE_LT
Creates the view MYTABLE, for use by your application for querying and DML
Creates an INSTEAD OF trigger (owned by WMSYS) on the view to handle DML
Creates some other triggers on any parent tables for referential integrity
Creates one or two other tables (MYTABLE_AUX, and sometimes MYTABLE_LCK) for internal use only
Creates some other views (MYTABLE_CONF, MYTABLE_DIFF, MYTABLE_HIST, MYTABLE_LOCK, MYTABLE_MW) for application use where needed
Converts any triggers and VPD policies on the table to metadata and then drops them; these are managed by OWM from then on
Based on the grants that OWM gives to WMSYS (such as ON COMMIT REFRESH and QUERY REWRITE) I think the OWM tables are materialized views.
To change the structure of a version-enabled table, e.g. adding/modifying/removing a column, constraint, or trigger, the following steps must be done:
Call dbms_wm.BeginDDL('MYTABLE');
Make the changes to a special table called MYTABLE_LTS
Call dbms_wm.CommitDDL('MYTABLE');
Note that this will fail if the table happens to have any constraints or indexes that are longer than 26 characters – so keep this in mind when naming them.
One of the most pleasing features of OWM is that it is relatively idiot-proof; if you try to perform an operation that is not supported, OWM will simply raise an exception (e.g. “ORA-20061: versioned objects have to be version disabled before being dropped“) instead of leaving you with a mess to clean up. Therefore it’s generally safe to test your scripts by simply running them and seeing what happens. For example, try doing some damage to the underlying tables or views by changing columns or dropping them – OWM will stop you. I would never do this sort of experiment in a production environment, of course!
Column comments on a table that becomes version-enabled are not migrated automatically to the view. They do remain on the renamed table (MYTABLE_LT). You can add comments to the view columns (and you don’t need to execute the BeginDDL/CommitDDL procedures for this); the same applies to the TABLE_LT table as well. Note, however, that if you remove the versioning from the table the view is dropped along with its comments, so if you later re-enable versioning you might want to re-apply the column comments as well.
To copy/synchronize the column comments from the underlying MYTABLE_LT table to the MYTABLE view, I use this script: sync_comments_lt_to_view.sql.
Implementing Workspace Manager
For guidance on how to take advantage of Oracle Workspace Manager in an APEX application, I watched this video by Dan McGhan. He demonstrates it in a javascript application but the real work is all done on the database in PL/SQL, which can be used by any application environment including APEX.
These are some of the API calls that I’ve used to build OWM features into my application:
My APEX application already uses VPD (or Row Level Security) to provide a multi-tenant environment for a wide range of users. Groups of users are assigned to one or more Security Groups; when they login they are assigned to one Security Group at a time which is set in a Global Application Context. A VPD policy has been applied to most tables like this:
function vpd_policy
  (object_schema in varchar2
  ,object_name in varchar2
  ) return varchar2 is
begin
  return q'[security_group_id=sys_context('CTX','SECURITY_GROUP_ID')]';
end vpd_policy;
The Application Context is associated with the APEX session’s Client Identifier (e.g. JBLOGGS:16630445499603) so each page request will be executed within the correct VPD context. A procedure is called from the Post-Authentication Procedure Name on the authentication scheme which sets the SECURITY_GROUP_ID context variable.
According to the docs, OWM can work along with VPD. However, you need to be aware of a few considerations:
Row-level security policies are not enforced during workspace operations, including MergeWorkspace and RollbackToSP.
Row-level security policies must be defined on a number of views, not just the view for the version-enabled table.
Don’t apply policies to the underlying tables created by OWM.
You can add VPD policies to a table prior to version-enabling it and these will be handled correctly by OWM when you version-enable it. However, if I need to add VPD policies after a table has been version-enabled, this is the code I run:
declare
  target_table varchar2(30) := 'MYTABLE';
begin
  for r in (
    select view_name
    from user_views
    where view_name in (target_table
                       ,target_table||'_LOCK'
                       ,target_table||'_CONF'
                       ,target_table||'_DIFF'
                       ,target_table||'_HIST'
                       ,target_table||'_MW')
  ) loop
    begin
      dbms_rls.add_policy
        (object_name     => r.view_name
        ,policy_name     => 'security_policy'
        ,policy_function => 'security_pkg.security_policy'
        ,update_check    => true
        ,static_policy   => true);
    exception
      when others then
        if sqlcode != -28101 /*policy already exists*/ then
          raise;
        end if;
    end;
  end loop;
end;
It adds the policy to the base view, as well as the five specific associated views (mytable_LOCK, mytable_CONF, mytable_DIFF, mytable_HIST and mytable_MW). Similar code may be used to alter or drop policies.
Note: with relation to VPD policies, the documentation doesn’t specifically mention the Multi-Workspace (_MW) view. As far as I can tell, however, this is required – because when you version-enable a table, a VPD policy on a non-version-enabled table will be applied by Workspace Manager to this _MW view as well as the other views.
Since a user’s changes within a workspace will be restricted to data for their Security Group, a MergeWorkspace works just fine – even though technically the merge occurs across the entire table ignoring the VPD policy, the only changes we expect are those for the user’s Security Group.
However, Savepoints are different; like workspaces, they are a snapshot of the entire table; if you issue a RollbackToSP, it will ignore any VPD policies and rollback all data to the selected savepoint. This means that you can’t use RollbackToSP to give users the ability to rollback their data to a snapshot, while isolating their changes to their VPD context. For this reason I don’t use RollbackToSP in my application.
All together – OWM, VPD and APEX
The users of my application need to be able to create scenarios for people in their Security Group to make proposed changes, see how the changes affect the reports, and merge those changes back to the “live” version. To facilitate this, I create a table to list the workspaces, and apply the VPD policy to it so that users can only view and work with workspaces for their Security Group.
create table scenarios (
  scenario_id         number
    default to_number(sys_guid()
                     ,'XXXXXXXXXXXXXXXXXXXXXXXXXXXXXXXX')
    not null
 ,scenario_name       varchar2(200) not null
 ,wm_workspace        varchar2(30) not null
 ,security_group_id   number
    default sys_context('CTX','SECURITY_GROUP_ID')
    not null
 ,constraint scenario_pk primary key (scenario_id)
 ,constraint scenario_uk unique (wm_workspace)
);
Each scenario has an internal ID (in this case, a surrogate key generated from a GUID), a user-specified name, and a name for the workspace. I didn’t use the user-entered name for the workspace name because (a) it must be unique across the database, and (b) it is limited to 30 characters.
After a user clicks the “Create Scenario” button and enters a name, the page process calls the following procedure (within the package security_pkg associated with the context):
procedure create_scenario
(scenario_name in varchar2
,keep_refreshed in boolean := false) is
l_wm_workspace varchar2(30);
begin
-- workspace name must be unique and &lt;=30 chars
l_wm_workspace := to_basex
(to_number(sys_guid(),'XXXXXXXXXXXXXXXXXXXXXXXXXXXXXXXX')
,36);
-- record the new scenario
insert into scenarios (scenario_name, wm_workspace)
values (create_scenario.scenario_name, l_wm_workspace);
-- create the workspace
dbms_wm.CreateWorkspace
(workspace => l_wm_workspace
,isrefreshed => keep_refreshed
,description => scenario_name
|| ' ('
|| sys_context('CTX','SECURITY_GROUP')
|| ')'
,auto_commit => false);
-- reset the savepoint, if required
dbms_session.clear_context
(namespace => 'CTX'
,attribute => 'WM_SAVEPOINT'
,client_id => sys_context('userenv','CLIENT_IDENTIFIER'));
-- go to the workspace on the next page view
dbms_session.set_context
(namespace => 'CTX'
,attribute => 'WM_WORKSPACE'
,value => l_wm_workspace
,client_id => sys_context('userenv','CLIENT_IDENTIFIER'));
end create_scenario;
In my APEX application Security Attributes, I have the following:
Initialization PL/SQL Code
security_pkg.init_apex_session;
Cleanup PL/SQL Code
security_pkg.cleanup_apex_session;
The procedures called above are as follows:
procedure wm_init is
begin
  dbms_wm.GotoWorkspace(nvl(sys_context('CTX','WM_WORKSPACE')
                           ,'LIVE'));
  dbms_wm.GotoSavepoint(nvl(sys_context('CTX','WM_SAVEPOINT')
                           ,'LATEST'));
end wm_init;

procedure init_apex_session is
begin
  wm_init;
end init_apex_session;

procedure cleanup_apex_session is
begin
  dbms_wm.GotoWorkspace('LIVE');
  dbms_wm.GotoSavepoint('LATEST');
end cleanup_apex_session;
The effect of this is that for each page request, the user’s selected workspace and/or savepoint is activated, or if they have not yet chosen a workspace or savepoint, the “live” workspace and “latest” savepoint is selected (which are the defaults). At the end of each page request, the session is reset to the “live” workspace and “latest” savepoint.
“That makes two of us.”
Create a Snapshot
Here is my code to create a snapshot, using the Workspace Manager SavePoint feature:
procedure create_snapshot
(snapshot_name in varchar2) is
l_wm_workspace varchar2(30);
l_wm_savepoint varchar2(30);
begin
-- savepoint name must be unique and &lt;=30 chars
l_wm_savepoint := to_basex
(to_number(sys_guid(),'XXXXXXXXXXXXXXXXXXXXXXXXXXXXXXXX')
,36);
l_wm_workspace := nvl(sys_context(CTX,'WM_WORKSPACE'), 'LIVE');
-- record the snapshot
insert into snapshots
(snapshot_name
,wm_workspace
,wm_savepoint)
values
(create_snapshot.snapshot_name
,l_wm_workspace
,l_wm_savepoint);
-- create the savepoint
dbms_wm.CreateSavepoint
(workspace => l_wm_workspace
,savepoint_name => l_wm_savepoint
,description => snapshot_name
|| ' ('
|| sys_context(CTX,'SECURITY_GROUP')
|| ')'
,auto_commit => false);
end create_snapshot;
Go to a Scenario
This sets the context for the user’s session so that subsequent page requests will load the specified Workspace. Any DML the user performs on version-enabled tables will be private to the workspace.
procedure goto_scenario (scenario_name in varchar2) is
  l_wm_workspace varchar2(30);
begin

  -- retrieve the workspace name for the given scenario
  select s.wm_workspace into l_wm_workspace
  from scenarios s
  where s.scenario_name = goto_scenario.scenario_name;

  -- reset the savepoint, if required
  dbms_session.clear_context
      (namespace => 'CTX'
      ,attribute => 'WM_SAVEPOINT'
      ,client_id => sys_context('userenv','CLIENT_IDENTIFIER'));

  -- go to the workspace on the next page view
  dbms_session.set_context
      (namespace => 'CTX'
      ,attribute => 'WM_WORKSPACE'
      ,value     => l_wm_workspace
      ,client_id => sys_context('userenv','CLIENT_IDENTIFIER'));

end goto_scenario;
View a Snapshot
This sets the context for the user’s session so that subsequent page requests will be viewing the specified Savepoint. The version-enabled tables will be read-only; any DML on them will raise an exception.
procedure goto_snapshot (snapshot_name in varchar2) is
  l_wm_workspace varchar2(30);
  l_wm_savepoint varchar2(30);
begin

  -- retrieve the details for the given snapshot
  select s.wm_workspace
        ,s.wm_savepoint
  into   l_wm_workspace
        ,l_wm_savepoint
  from snapshots s
  where s.snapshot_name = goto_snapshot.snapshot_name;

  -- set the workspace and savepoint on the next page request

  dbms_session.set_context
      (namespace => 'CTX'
      ,attribute => 'WM_WORKSPACE'
      ,value     => l_wm_workspace
      ,client_id => sys_context('userenv','CLIENT_IDENTIFIER'));

  dbms_session.set_context
      (namespace => 'CTX'
      ,attribute => 'WM_SAVEPOINT'
      ,value     => l_wm_savepoint
      ,client_id => sys_context('userenv','CLIENT_IDENTIFIER'));

end goto_snapshot;
Go to Live
When the user is in a Scenario, and they wish to go back to “Live”, they can click a button which executes the following procedure. Their next page request will go to the LATEST savepoint in the LIVE workspace.
procedure goto_live is
begin

  dbms_session.clear_context
      (namespace => 'CTX'
      ,attribute => 'WM_WORKSPACE'
      ,client_id => sys_context('userenv','CLIENT_IDENTIFIER'));

  dbms_session.clear_context
      (namespace => 'CTX'
      ,attribute => 'WM_SAVEPOINT'
      ,client_id => sys_context('userenv','CLIENT_IDENTIFIER'));

end goto_live;
Go to Latest
When the user is viewing a Snapshot, and they wish to go back to “Latest” (so they do DML, etc.), they can click a button which executes the following procedure. This works regardless of whether they are in the Live workspace or viewing a scenario. Their next page request will go to the LATEST savepoint.
procedure goto_latest is
begin

  dbms_session.clear_context
      (namespace => 'CTX'
      ,attribute => 'WM_SAVEPOINT'
      ,client_id => sys_context('userenv','CLIENT_IDENTIFIER'));

end goto_latest;
Compare two Scenarios
When the user wishes to analyze the differences between two scenarios, or between a scenario and the Live workspace, there is a two-step process:
The user selects two Scenarios (or the “Live” workspace) from some select lists; the return value of these select lists should be the wm_workspace column from the table, or 'LIVE' for the Live workspace.
The user clicks a button to execute the find_diffs1 procedure (see below).
The page has a report on the view mytable_DIFF.
procedure find_diffs1
  (wm_workspace1 in varchar2
  ,wm_workspace2 in varchar2) is
begin

  dbms_wm.SetDiffVersions
    (workspace1   => wm_workspace1
    ,workspace2   => wm_workspace2
    ,onlyModified => true);

end find_diffs1;
Compare Snapshots
When the user wishes to analyze the differences between two snapshots (in any workspace), or between the latest data and a snapshot, a similar process is used:
The user selects two Snapshots (or the “Latest” snapshot for either the Live workspace or a given Scenario); the return values of these select lists should be the wm_workspace and wm_savepoint, e.g. wm_workspace||':'||wm_savepoint.
The user clicks a button to execute the find_diffs2 procedure (see below).
The page has a report on the view mytable_DIFF.
procedure find_diffs
  (workspace_savepoint1 in varchar2
  ,workspace_savepoint2 in varchar2) is
  l_sep1 number := instr(workspace_savepoint1,':');
  l_sep2 number := instr(workspace_savepoint2,':');
begin

  dbms_wm.SetDiffVersions
    (workspace1   => substr(workspace_savepoint1, 1, l_sep1-1)
    ,savepoint1   => substr(workspace_savepoint1, l_sep1+1)
    ,workspace2   => substr(workspace_savepoint2, 1, l_sep2-1)
    ,savepoint2   => substr(workspace_savepoint2, l_sep2+1)
    ,onlyModified => true);

end find_diffs;
Merge a Scenario
In my system, I don’t allow users to create scenarios within scenarios, although this is possible with Workspace Manager. If the user wishes to merge all changes in a Scenario to Live, they click a button to execute the following procedure:
wm_error_55 exception;
wm_error_56 exception;
pragma exception_init(wm_error_55, -20055);
pragma exception_init(wm_error_56, -20056);

procedure merge_scenario is
  l_wm_workspace varchar2(30);
begin

  l_wm_workspace := sys_context('CTX','WM_WORKSPACE');

  goto_live;
  wm_init;

  -- merge the workspace
  dbms_wm.MergeWorkspace
    (workspace        => l_wm_workspace
    ,remove_workspace => true
    ,auto_commit      => false);

  -- delete the scenario
  delete scenarios s
  where s.wm_workspace = merge_scenario.scenario_id;

exception
  when wm_error_55 or wm_error_56 then
    -- unable to merge due to conflicts

    -- go back into the workspace
    dbms_session.set_context
      (namespace => 'CTX'
      ,attribute => 'WM_WORKSPACE'
      ,value     => l_wm_workspace
      ,client_id => sys_context('userenv','CLIENT_IDENTIFIER'));

    -- caller should redirect user to the "resolve conflicts" page
    raise e_merge_conflict;

end merge_scenario;
This will fail with an exception if there are any conflicting changes in the Live workspace, e.g.:
a record was updated in the scenario, but was deleted in Live
a record was updated or deleted in the scenario, but also updated in Live
a record was inserted in the scenario, but another record with the same PK was inserted in Live
If the workspace had been created with the isrefreshed option, the changes being made in Live will be automatically copied to the workspace so these conflicts should be minimised; however, conflicts cannot always be avoided. To give the user the ability to analyze the conflicts, you would perform the following steps:
Allow the user to select an action for each record in conflict – either “PARENT” (keep the parent, i.e. discard the change in the scenario) or “CHILD” (keep the child, i.e. discard the change made in Live).
For each record, call dbms_wm.ResolveConflicts (see example below).
The ResolveConflicts procedure takes a where clause that identifies the row (or rows) to mark as resolved. In my case, I just call it with the id for each record the user chose:
for r in (
  ...query on something, e.g. an APEX collection...
  ) loop

  dbms_wm.ResolveConflicts
    (workspace    => sys_context('CTX','WM_WORKSPACE')
    ,table_name   => 'MYTABLE'
    ,where_clause => 'id=' || r.id
    ,keep         => r.action /*'PARENT' or 'CHILD'*/);

end loop;
If the conflicts are across multiple tables, the UI will probably be a bit more complicated. You’d have to resolve conflicts on all the affected tables before the Merge can succeed.
“Don’t let a white fence and a promotion end the world for you.”
Delete a Scenario
Deleting a scenario uses RemoveWorkspace:
procedure delete_scenario
  (scenario_name in varchar2) is
  l_wm_workspace varchar2(30);
begin

  -- retrieve the workspace name for the given scenario
  select s.wm_workspace into l_wm_workspace
  from scenarios s
  where s.scenario_name = delete_scenario.scenario_name;

  -- get out of the workspace
  goto_live;
  wm_init;

  -- delete the workspace
  dbms_wm.RemoveWorkspace
    (workspace   => l_wm_workspace
    ,auto_commit => false);

  delete scenarios s
  where s.wm_workspace = l_wm_workspace;

end delete_scenario;
Delete a Snapshot
Deleting a snapshot uses DeleteSavepoint:
procedure delete_snapshot
  (snapshot_name varchar2) is
  l_wm_workspace varchar2(30);
  l_wm_savepoint varchar2(30);
begin

  -- retrieve the details for the given snapshot
  select s.wm_workspace
        ,s.wm_savepoint
  into   l_wm_workspace
        ,l_wm_savepoint
  from snapshots s
  where s.snapshot_name = delete_snapshot.snapshot_name;

  -- get out of the snapshot/scenario:
  goto_latest;
  wm_init;

  -- delete the savepoint
  dbms_wm.DeleteSavepoint
    (workspace      => nvl(l_wm_workspace,'LIVE')
    ,savepoint_name => l_wm_savepoint
    ,auto_commit    => false);

  delete snapshots s
  where s.wm_savepoint = l_wm_savepoint;

end delete_snapshot;
Row History
One of the requirements of my application was to show a report of the entire history of edits to each record in a table. Since I’m already going to version-enable this table, it makes sense to take advantage of the Row History feature of Oracle Workspace Manager.
When you version-enable a table, OWM creates a view called MYTABLE_HIST which includes all the columns of the table, plus the following columns: WM_WORKSPACE, WM_VERSION, WM_USERNAME, WM_OPTYPE, WM_CREATETIME, and WM_RETIRETIME. By default, when you version-enable a table, OWM keeps only a minimal set of history in order to support other features in use, such as snapshots. In order to retain a complete history of changes to the record, enable versioning with the View Without Overwrite history option:
begin
  dbms_wm.EnableVersioning('MYTABLE'
    ,hist => 'VIEW_WO_OVERWRITE');
end;
This stops OWM from overwriting the history of changes to each record, so it can be queried via the _HIST view.
Now, I wanted to expose the contents of this view to my users, and for each history record show Who did it and When. “When” is easily answered by WM_CREATETIME, which is a TIMESTAMP WITH TIME ZONE. “Who” would normally be answered by WM_USERNAME, but since we’re in APEX, this will always be 'APEX_PUBLIC_USER' which is not very useful. Therefore, I have an ordinary column in my table called DB$UPDATED_BY which is set by the following ordinary trigger:
create trigger MYTABLE$TRG
  before update on MYTABLE
  for each row
begin
  :new.db$updated_by :=
     coalesce(sys_context('APEX$SESSION','APP_USER')
             ,sys_context('USERENV','SESSION_USER'));
end MYTABLE$TRG;
This means my report will show the actual APEX username of who created or updated the record.
The WM_OPTYPE column in the _HIST view will be 'I' (inserted), 'U' (updated), or 'D' (deleted). I can translate this code into user-friendly values for reporting purposes, but there is one problem: when a row is deleted, the _HIST table knows the username who deleted the record, but we never recorded the APEX username. Our db$updated_by column wasn’t changed, so it simply shows whoever last updated the records before it was deleted.
To solve this, we have two options: (1) Write the application to do a quick no-change UPDATE on each row immediately before deleting it; then do some fancy footwork in the view to show this as a “Delete” operation. (2) Don’t allow the application to execute actual DELETEs – in other words, use a “soft-delete” design.
I’ve gone with option (2) which is what the users needed anyway – they needed to be able to Delete and Undelete records at will, so I’ve only granted INSERT and UPDATE on the table and the application will translate a request to “DELETE” into an update of a “deleted” flag on the table. A request to Undelete a record is simply another update to set the “deleted” flag to NULL. All reports in the application have a predicate to filter out any deleted records unless the user is viewing the “recycle bin”. In addition, if the user is viewing a deleted record, I put the form into “Readonly” mode – the only thing they can do is Undelete it (thereafter, they can modify the record if they wish).
I’ve created the following view in order to show the history of changes to a record:
create or replace view mytable_hist_vw as
select x.id, x.name, etc.
      ,l.wm_createtime as op_timestamp
      ,case
       when x.wm_optype = 'U'
        and x.deleted_ind = 'Y'
        and lag(x.deleted_ind,1)
            over (partition by x.id
                  order by x.wm_createtime) is null
       then 'Deleted'
       when x.wm_optype = 'U'
        and x.deleted_ind is null
        and lag(x.deleted_ind,1)
            over (partition by x.id
                  order by x.wm_createtime) = 'Y'
       then 'Undeleted'
       when x.wm_optype = 'I' then 'Created'
       when x.wm_optype = 'U' then 'Updated'
       when x.wm_optype = 'D' then 'Deleted permanently'
       end as op_desc
      ,case
       when x.wm_optype = 'D'
       then x.wm_username
       else x.db$updated_by
       end as op_by
from   mytable_hist x
I interpret an WM_OPTYPE of 'D' as “Deleted permanently”. This might occur if we do a delete directly on the table, e.g. via a data fix run directly on the database. In this case I report the username according to the wm_username column since we won’t have the APEX user name.
The new Form Region feature introduced in Oracle APEX 19.1 is a big improvement to the way that single-record forms are defined declaratively.
In prior versions of APEX, you were effectively limited to a single DML load process and a single DML submit process, and all the items on the page that were linked to a table column were required to be from only a single table. If you wanted to do anything more complicated than that, you had to either split your form into multiple pages or get rid of the DML processes and hand-code the PL/SQL yourself.
The new components/attributes for Form Regions are:
Region type “Form” which defines the Source Table (or view, or SQL Query, or PL/SQL returning a SQL query, or Web Source) and associated semantics.
Item Source attribute that associates each item with a particular Form Region. The item can optionally be marked as “Query Only” and/or as a “Primary Key”.
Pre-render process type “Form – Initialization” that is associated with a Form Region.
Page process type “Form – Automatic Row Processing (DML)” that is associated with a Form Region. This can be used to change the Target for the form region (default is the Source Table) to a different table or view, or to replace the DML processing with your custom PL/SQL. You can also modify other semantics such as Prevent Lost Updates and row locking.
If you generate a single-record form page APEX will generate all the above for you and you can then customise them as you need.
Now, I want to create a slightly more complex form – one based on two tables that are related – “Transaction Lines” and “Reserve Lines” have the same Primary Key, and a referential integrity constraint linking them. They act like a “super class / subclass”, where one table (“Reserve Lines”) is optional. This data model eliminates the need to have lots of nullable columns in a base table.
Data model
Here’s the form for editing a single “Transaction Line”:
Form with “Reserve” unticked
The form shows the associated “Reserve Line” if it exists:
Form with “Reserve” ticked
If the “Reserve” checkbox is ticked, the Reserve details region is shown and the user can enter the Reserve Line attributes.
I need the page to perform the following actions:
For a new record, if the user leaves “Reserve” unticked, only a Transaction Line should be inserted.
For a new record, if the user ticks “Reserve”, both a Transaction Line and a Reserve Line should be inserted.
For an existing record, if the user ticks or unticks “Reserve”, the Reserve Line should be inserted or deleted accordingly.
If you want to see this example in action, feel free to try it out here: https://apex.oracle.com/pls/apex/f?p=JK201904&c=JK64 (login using your email address if you want). The starting page is a blank transaction; click “Create”, then click “Add Line” to open the transaction line page.
The page is composed of two Form Regions. Note that in this example I’ve laid out all the items for each form within its Form Region, but this is not strictly necessary.
To do this, I built the form in the following manner:
Created a Form Region for the Transaction Line with standard Initialize form and Automatic Row Processing (DML) processes.
Created a second Form Region for the Reserve Line with the standard processes (but customised later).
Added the “P2_RESERVE_Y” checkbox item, not linked to any source column. Added a dynamic action to show/hide the Reserve details region if it is ticked/unticked.
Added a “set up reserve line” PL/SQL Code process immediately after the Initialize form Transaction Line and just before the Initialize form Reserve Line process:
Server-side Condition Type = Rows returned
SQL Query = select null from reserve_lines where line_id=:P2_LINE_ID
5. Change the Automatic Row Processing (DML) for the Reserve Line region:
Target Type = PL/SQL Code
PL/SQL Code to Insert/Update/Delete:
case when :P2_RESERVE_Y is null then

  delete reserve_lines where line_id=:P2_RESERVE_LINE_ID;

when :P2_RESERVE_Y is not null
and :P2_RESERVE_LINE_ID is null then

  insert into reserve_lines
    (line_id,asset,target_amt,target_year)
  values
    (:P2_LINE_ID,:P2_ASSET,:P2_TARGET_AMT,:P2_TARGET_YEAR )
  returning line_id into :P2_RESERVE_LINE_ID;

when :P2_RESERVE_Y is not null
and :P2_RESERVE_LINE_ID is not null then

  update reserve_lines
    set asset=:P2_ASSET
       ,target_amt=:P2_TARGET_AMT
       ,target_year=:P2_TARGET_YEAR
  where line_id=:P2_RESERVE_LINE_ID;

else
  null;
end case;
6. Add a special handler to delete the reserve line if the user clicks the Delete button (this needs to be executed prior to the Process form Transaction Line to avoid a FK violation).
This solution is not quite as “low-code” as I’d like; it would be simpler to call a TAPI here instead of hardcoding the DML statements. The reason we need custom PL/SQL here is that when the user clicks the “Create” or “Save” buttons (which are associated with the SQL Insert and Update actions, respectively), we often need to translate this into a different DML action (insert, update, or delete) for the Reserve Lines table.


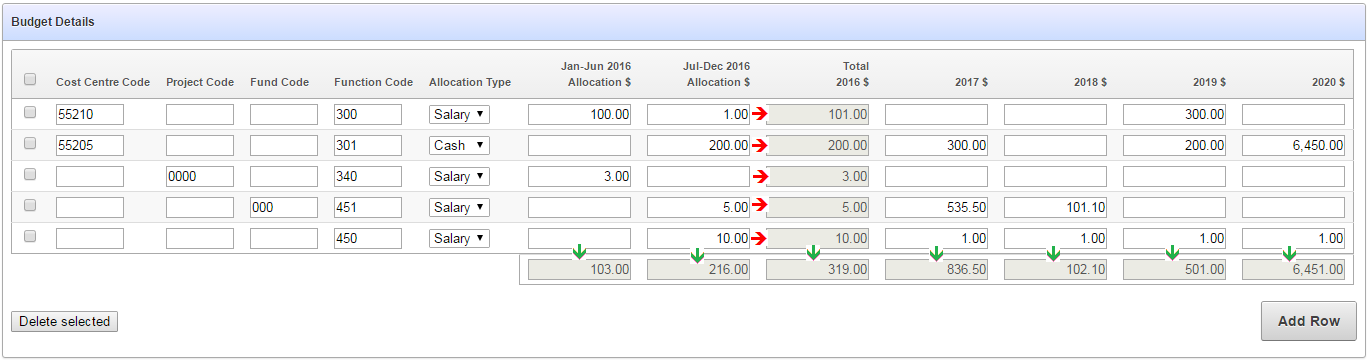
 Sending emails from the Oracle database can be both simply deceptively braindead easy, and confoundingly perplexingly awful at the same time. Easy, because all you have to do is call one of the supplied mail packages to send an email:


 For a number of years now I’ve been using

 So you’ve built an APEX application to solve a problem for one client, or one department, or just yourself – and you think it might be useful for others as well. How do you make that application available for other users, departments, or companies to reuse, while ensuring each sees only their own data and cannot mess around with others’ data?
 a. Tenant isolation – no tenant sees data for another tenant; no tenant can affect the app’s behaviour for another tenant; protect against “noisy neighbours” (i.e. those which impact system capacity and performance).


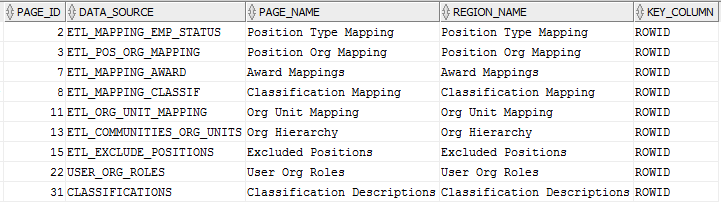
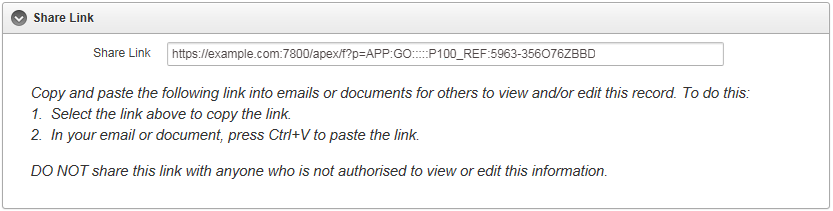 Sometimes my customers need to be able to get a direct link to a record in their APEX application which they can share with others (e.g. to publish it on a website, or send by email to a colleague).


